resharper 9 file templates
ReSharper is the ubiquitous Visual Studio add-on. You have likely been using it happily for some time now. If not, please stop now and go check it out. For everyone else, let’s take a look at a feature of ReSharper known as File Templates.
File Templates are a convenient way to create a new file with predefined code. These file can help save you the trouble of tediously re-typing common files. In this case we’re going to create File Templates for our imaginary application that uses Fluent Migrator.
“I’m aware ready-made File Templates are available for Fluent Migrator but this tutorial is about creating templates not importing existing ones.”
Fluent Migrator is a tool that allows us to define database migration scripts using c# code. Each migration is defined as a new class with methods describing the required schema changes. As you can imagine you’ll end up writing hundreds if not thousands of these migration files over the lifetime of the product. Instead of creating these by hand we’ll make a new File Template that already contains all the boilerplate code needed.
Creating a new File Template
To get started we’ll open the Template Explorer by clicking the ReSharper menu, selecting Tools, and then Template Explorer….
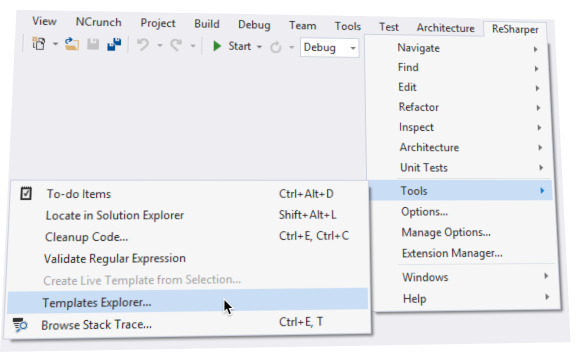
Click the New Template button. It looks like a window with a star in the upper left corner.

A new window containing our empty File Template will open.
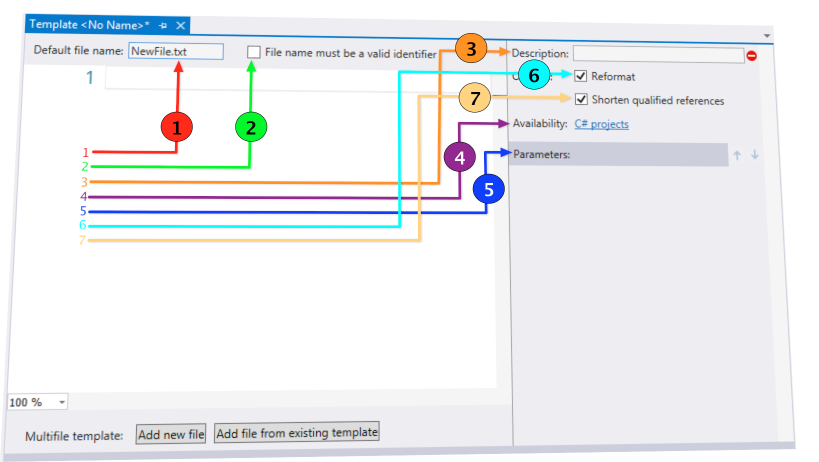
- This is the default filename offered to users of the template.
- This option will have ReSharper validate the filename can be used as a valid c# type identifier.
- This is really the name of the template.
- Determines when this template is available.
- Lists all the variables that have been defined for this template.
- If selected ReSharper will clean up/format the code when using the template.
- This allows ReSharper to add required using statements and remove redundant qualifiers.
The completed template is listed below with descriptions of the various parts.
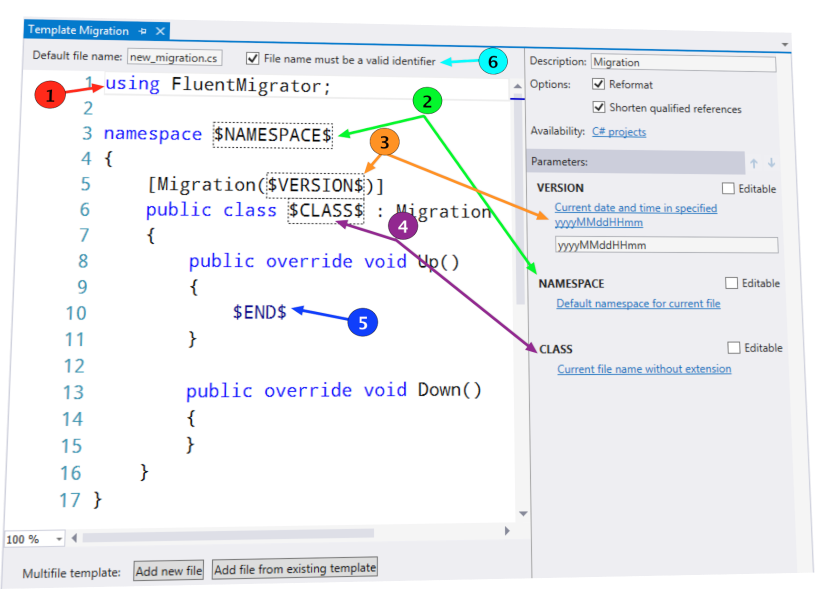
- Be sure to include any using statements needed by your template.
- The
$NAMESPACE$variable is using the Default namespace for current file macro. This will ensure the correct namespace is generated. - The
$VERSION$variable is using the Current date and time in specified format macro using the yyyyMMddHHmm format string. - The
$CLASS$variable is using the Current file name without extension macro which takes uses the filename provided by the user as the class name. - Place the
$END$variable where you want the end user’s cursor after using your template. In this case it will be in theUp()method to start defining a migration.
Tips
- You can include any number of variables by typing a name surrounded with
$. - To change the macro used by a variable click the blue line under its name in the Parameter section.
- You can save File Templates at different setting layers including one shared across all team members.
- You can create multifile templates by clicking the Add new file button at the bottom of the template editor.
Resources
- development
- resharper
- visual studio